Chronic neck pain and/or limitations in your neck mobility can be incredibly frustrating. There are numerous causes of chronic neck pain; and endless actions that can trigger a flare up in individuals suffering from neck pain.
At BIM, we take the following approach when programming for an individual with neck pain:
- Identify where the movement restrictions are present in the neck, scapulae, shoulders and spine
- Pinpoint the muscle imbalances that are contributing to or being caused by the issue—in both a resting posture as well as during all relevant movements affecting the neck region
- Implement corrective strategies to address the muscular imbalances that are affecting neck posture and movement
- Ensure all mobility exercises are done in a pain-free range of motion
- Work on improving general awareness of neck position and the daily habits that could be irritating neck pain and/or inhibiting the healing process
- Improve general upper body and core strength progressively to restore general function and strength capacity
Below are three common exercises that we use at BIM to help improve neck function.
If you are in an acute phase of a neck injury (such as whiplash) please consult with your doctor and/or the therapist that is treating you before attempting to introduce any new exercises to avoid potential irritation of your injury.
Modified Neck CARS
CARS, or Controlled Articular Rotations, is a principle adopted from the Functional Range Conditioning (FRC) system developed by Dr. Andreo Spina. The concept behind CARS is that the joint capsule relays multidirectional and rotatory information to the central nervous system. Provided the right stimulus is given to a joint, research has shown that you are able to successfully gain range of motion of that joint and more muscular control accordingly.
At BIM we generally start with a modified version of this exercise to keep clients from having to go into a neck extension (ie. looking up) until they demonstrate good control and can tolerate this action better. We will also avoid neck extension for clients that may be at more risk for arthritic changes (ie. anyone over the age of 50) in the cervical spine, as neck extension can often cause irritation for that population.
The general rule we use is to try to access as much range of motion as you can with no pain during or after the action.
Coaching Cues:
- Start by drawing your neck towards your chest, then to one shoulder, over that shoulder, up towards the ceiling, down towards your other shoulder and back to the starting position.
- There should be no discomfort or pinch sensation. If you experience either of those sensations work in a reduced range of motion. The more you do this the more you will become connected to where the restrictions and compensation in your neck reside.
- Complete three to five articulations in one direction and then repeat the same in the opposite direction.
This drill can be performed in a tall kneeling, seated, or standing position. If you tend to lean back during neck extension—or arch your lower back in general—try this exercise in a tall kneeling or seated before progressing it to standing.
Chin Tucks/Neck Crunches
The goal of the chin tuck is to successfully activate your deep neck flexors while keeping your Scalenes and Sternocleidomastoid (SCM) relatively relaxed.
To help you understand what I mean by that, I’ll give you a brief anatomy review.
The deep neck flexors (Longus Capitis and Longus Colli) are small stabilizing muscles located on the front and side surfaces of the cervical spine and are deep to the Sternocleidomastoid muscle.
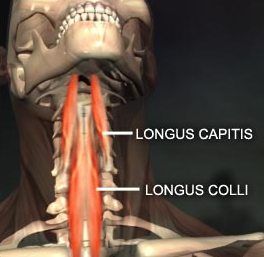
Your deep neck flexors play an important role in stabilizing your neck as well as facilitating a neutral neck position. Those who tend to have weakness of this muscle will generally rock a more head forward posture.
Coaching Cues:
- Start by completing this exercise while lying on your back. Some may want to place a small pillow or foam block under their neck for better support.
- Place your fingertips on the muscle at the front of your neck to ensure that your superficial neck muscles stay relaxed as you pull your chin towards your chest. This will allow you to focus on engaging the deeper muscles.
- Perform five to 20 reps of this exercise, holding each rep for three to 10 seconds (start on the lower spectrum and gradually build yourself up).
- Once you can successfully complete 20 reps you can progress to what we can the neck crunch.
*Note: You can also progress this exercise to seated or standing variations.
A progression from the Chin Tuck is the Neck Crunch. The objective of this exercise is to retrain the deep flexors to activate in conjunction with strengthening the superficial neck flexors.
Coaching Cues:
- Perform a Chin Tuck as directed above then lift your head and shoulders up slightly. Your goal is to not lose your Chin Tuck during the execution of the head lift.
- For many this exercise will feel incredibly challenging, so be conservative with how many reps you perform, especially at first. We generally start with three sets of five repetitions and progress to three sets of 20 over a period of time (three to eight weeks depending on client tolerance).
- The next step is to focus on achieving and maintaining a strong and neutral neck position in other exercises as well as everyday life.
A side plank is a good example of this and one that often people don’t emphasize good neck position.
Front/Side Plank
The more often you focus on achieving a proper neck position, the more opportunity you will have to gain adequate strength and endurance in your neck – which will help you reduce compensation. Aim to focus engaging your deep neck flexors during other common exercises. I am highlighting the Side Plank and Front Plank, but you can apply this principal to any exercise.
Generally when it comes to addressing neck issues, you want to become hyper aware of your neck and shoulder position. Exercises will help, but what you do throughout the day will have a greater impact on your inevitable recovery. Paying attention to your neck position by using the strategies outlined within this post have been super helpful with our clients here at BIM. Additionally, we also recommend that you are mindful and avoid shrugging your shoulders (by keeping your shoulders away from your ears as much as possible) and/or working on utilizing diaphragmatic breathing on a regular basis. You can check out this post to learn more on that.
If you have any questions about any of the exercise or this general protocol please do not hesitate to reach out.
You can also schedule a Free Fitness Assessment by clicking HERE.


